You have probably heard about autoresponders, and how modern marketing platforms use traditional autoresponders in their automation workflows. Unlike traditional autoresponders, Neurons enable autonomous, freeform automations, letting you perform actions that go beyond email responses. With Neurons, you can set up multiple, instantaneous, and independent responses to every customer action. This article breaks down the meaning of Neurons/advanced autoresponder, the benefits for your business, as well as how to configure Neurons (autoresponder) on Go-Mailer.
What is Neurons/Advanced Autoresponder?
Unlike conventional autoresponders that create a single automated email response to specific customer actions, Go-Mailer’s Neuron system takes automation to the next level. Each Neuron works independently, delivering fast, automated responses to specific triggers.
For instance, imagine you’re running a fintech platform where users frequently transfer money. With Neurons, you can automatically send confirmation emails, update contact labels, and trigger actions in third-party applications – all happening in real-time as transactions occur.
Why is it Called Neurons?
The name “Neuron” isn’t just clever marketing; it’s inspired by the way our biological nervous system works. Just as neurons in your body instantly respond to stimuli (like quickly pulling your hand away from a hot surface), our Neurons system provides immediate, automated responses to business events.
This cutting-edge feature is exclusive to Go-Mailer, setting it apart from traditional marketing automation platforms.
Benefits of Advanced Autoresponder on Go-Mailer
Using Neurons offers several key advantages for businesses:
- Instant Response Capability: Unlike traditional automation workflows that might batch processes, Neurons respond immediately to triggers without waiting for other processes.
- Flexible Configuration: Each Neuron can handle multiple responses with optional delays, giving you precise control over your neuron processes.
- Independent Operations: Every Neuron functions independently, meaning one automation’s performance doesn’t affect others, creating a more reliable system.
- Customizable Delays: Need some actions to happen immediately while others wait? No problem! Each response can have its own delay configuration.
- Audit Trail: Every modification to your Neurons is tracked, providing accountability and making it easier to troubleshoot if needed.
- Subscription-based Flexibility: This advanced autoresponder system is exclusively available as a subscription-based add-on for Go-Mailer users, making it a premium feature for businesses serious about automation.
How to Configure Neurons (Autoresponder) on Go-Mailer
Now, let’s dive into the step-by-step process of setting up Neurons in Go-Mailer.
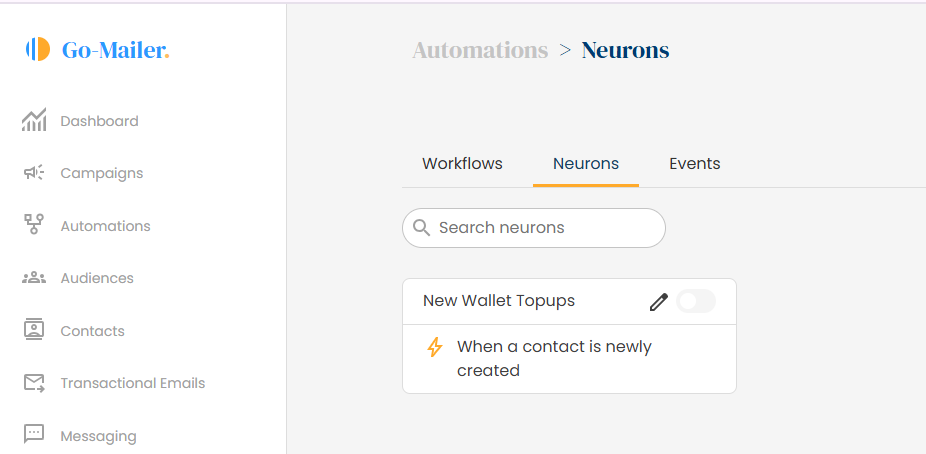
Navigate to the Neurons Dashboard
- Log in to your Go-Mailer account
- Go to the Automation section and click on Neurons
Creating Your First Neuron
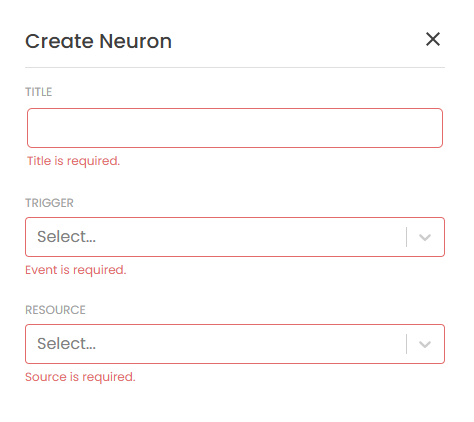
- Click the ‘Create’ button to open the creation modal
- Fill in the required fields:
- Title (required): Give your Neuron a descriptive name
- Description (optional): Add context about what this neuron does
- Select your trigger event from the dropdown menu. Choose from predefined triggers like “User Sign-Up,” “Purchase Made,” or custom triggers..
Adding Responses
- Click the +button
- Choose the effect you want to execute, such as “Send Email,” “Tag Contact,” or “Update segment.
- Configure any relevant resources for the effect
- Optionally, add a delay by clicking the delay icon. Note that If no delay is set, the action executes immediately.
- Repeat for Additional Effects: add as many actions as required for the Neuron. Each effect operates independently.
Important Notes
- Once created, you can only modify the title and responses of a Neuron
- Neurons are inactive by default but can be activated when needed
- Each Neuron must have at least one effect
- You can add as many responses as necessary to a single Neuron
Real-World Example: Automating FinTech Notifications
Let’s use a fintech app where users can send and receive money. A Neuron can handle a “Receive Money” event with the following responses:
- Send a transactional email to the sender.
- Tag the recipient as “Active User.”
- Update a third-party CRM with transaction details.
With Neurons, all these actions happen instantly, helping you save time and grow your business seamlessly.
Integrating Neurons with Your Application
Integrating Neurons with your application is straightforward. You’ll need to set up your application to fire events that Neurons can listen to and respond to automatically. Here’s how it works:
- Trigger Events in Your Application
To use Neurons, your application must emit events (e.g., “User Sign-Up” or “Purchase Completed”). You’ll need to implement these event triggers using your application’s backend. These events act as the starting point for Neurons to execute responses.
Getting Started
Before diving into creating and integrating Neurons, it’s important to ensure you have everything set up properly. Here’s how to get started with Neurons on Go-Mailer:
- Ensure You Have Access: Neurons are a subscription-based add-on. Confirm that your Go-Mailer account has this feature enabled. If not, reach out to your account manager or visit the subscription section to activate it.
- Familiarize Yourself with Neuron Components: Here are the basic elements of a Neuron:
- Trigger: The event that initiates the automation (e.g., a user action like signing up or making a purchase).
- Responses: Actions performed when the trigger is activated (e.g., sending an email, tagging a contact, or updating a CRM).
- Delay (Optional): A time interval before executing specific responses.
- Prepare Your Application for Integration:
- Identify key events in your application that you want to connect with Neurons.
- Check if your app supports webhooks or APIs for sending event data to Go-Mailer.